
This is a copy of my WordPress post, Writing “Correct” Programs. I’m using this to compare presentations between Markdown on this site and Blocks on WordPress.
Lately, it feels like I’ve had a problem making sure my programs are “correct.” I hope writing about it I’ll see a pattern that can be fixed. It’s frustrating for everyone when bugs slip into production systems, and it reflects badly on custom programming when these errors aren’t caught before the space is in use. After all, we don’t want to be the cause of the house burning down.

For starters, what do I mean by correct? How can a program be correct? It turns out this is a hard thing to prove. If we have a SIMPL program with over 10,000 signals changing, how do we know that each one is in the correct state at any given time? If we’re looking at a SIMPL# program with several objects interacting, how do we know they’re sending and receiving the proper messages? We’ll need to break these systems down into smaller chunks and prove that each one functions correctly. There are tests we can write to make sure the logic is sound, but we also need to test the system as a whole.
For example, say we have a module that drives our user interface page flips, pop-ups, subpages, etc. I would have a smaller separate program that exercises just this one module. Then, if I needed to test that a change doesn’t break its behavior, I can run this program to see how it responds. Once I know the module works well, I can pull it back into my main program and test how it integrates there.
This should be a repeated pattern:
- Identify changes or fixes needed in a module
- Update the module for use in the driver program
- Test that driver program produces no bugs
- Drop updated module into real program
- Test that program interfaces with module correctly
Ultimately, it comes down to perception: does our program appear to do the correct thing asked of it? Our goal is to have a program with no bugs, but maybe that is an unrealistic goal? Our process may not catch every error in the code, but it will at lesat catch the BIG ones. The ones that should never make it into a production system. If we lay a solid, bug-free foundation, the system we’re building will run with minimal problems.
Understanding the Scope of Work
Before we write any code, do we have all the proper documentation? You need a few documents to get started:
- SOW (Scope of Work) which parts of the project are handled by you or others
- BOM (Bill of Materials) which equipment was ordered
- CAD (Computer-Aided Drawings) might be functional, architectural, signal flow, etc.
I can’t tell you the number of times I’ve been asked to program a complete system and am missing any (or all) of these documents. It’s impossible to be successful without a proper roadmap. It might be hard to say NO, but if you forge ahead without all the information, you’re going to be guessing what is correct rather than proving the program is correct.
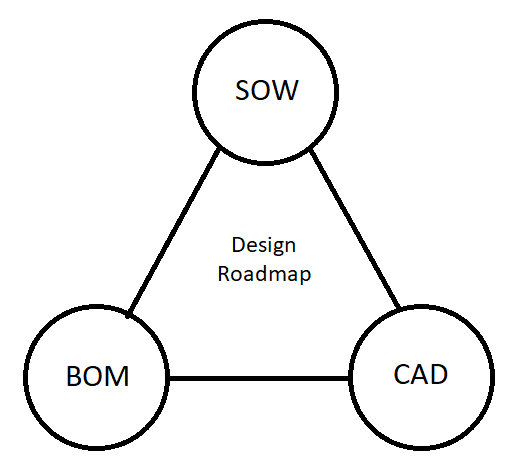 Remember: if you don’t see these three things, STOP!
Drawings
I’ve accepted Visio or hand sketches if time is crunched, but these types of drawings have to clearly call out where connections land between devices. If you program all your displays to switch to HDMI 1 but the installer landed everything on HDMI 3, you’re not going to see any sources. The drawings ensure the programming matches the installation.
Bill of Materials
Having the BOM can help alert you to discrepancies between the SOW and CADs. The BOM should be the document that was used to order actual equipment. It may end up meaning a simple swap between one device to another, but if you can program it right on the first try, you should.
With long lead times between orders and product availability, a lot of alternates are being chosen. These may not have made it to the drawing set, but they will be reflected on the BOM. Because devices may behave differently, it may shape the way you write your code. If the original device provides feedback but the substitution doesn’t, you’ll have to work around it in the revised code.
Scope of Work
There should be a document that delineates which party is responsible for each aspect of the project. Who configures the network? Who mounts the displays? Who programs the lighting system?
Usually the scope of work will note important items called out by the client. If there are other systems with existing programming, should we re-use that touchpanel layout? Should the rooms automate themselves to a schedule? Do occupancy sensors need to shut the system down when the room is vacant? The SOW should spell out the functionality that’s important to the client.
Unfortunately, in my experience, the SOW is usually a document copied from one project to the next and misses a lot of the key bullet points. I don’t know of a way to fix taht without getting involed earlier in pre-sales. Luckily, repeat projects with the same customer usually go smoother because I’ve learned their expectations and can open a communications channel sooner.
Unit Testing
Now that we’ve got all the documentation squared away, we’re ready to sit down and write our whole program from scratch, right? Of course not!
The first thing I look for, “Is there any equipment we’re controlling that I’ve never seen before?” If there is, the first thing I’m going to write is a driver program. This will be a tiny program whose whole purpose is to give me a way to explore controlling that specific equipment. If there is an existing module or library, I’ll make sure to use that. But the crucial element is: the size of the program must be tiny. This way you aren’t testing against bugs hidden in large, convoluted code. If you can successfully control the equipment in your driver program, the same should be true of a larger program. Of course, we’ll have to test again once we’ve incorporated everything into the larger code base.
This is how I unit test in SIMPL: start small and build up. Make sure things continue to work along the way. If there are verification tests taht can be run within the program (i.e.: a device reports its matrix routes, and your program can confirm those routes are what they should be), it’s helpful to add a testing_mode signal that you can simulate in SIMPL Debugger.
SIMPL# might have better options for unit testing, and Microsoft has a good document on writing unit tests. I’m not sure if this would be available when writing sandboxed SIMPL# code, I’ll have to investigate.
Integration Testing
Once you have all your little working pieces stitched together into your larger program, it’s time to test how well everything integrates together.
And to do this, you really need a checklist. Unless everything on your checklist is completed, you can’t say the program works 100%.
Here are some ideas for your checklist:
- Does every page flip happen correctly?
- Does every button have the proper feedback?
- Does every button have the correct style (icon, text, placement)?
- Do devices power on when in use?
- Do devices power off when the system is shutdown?
An Example
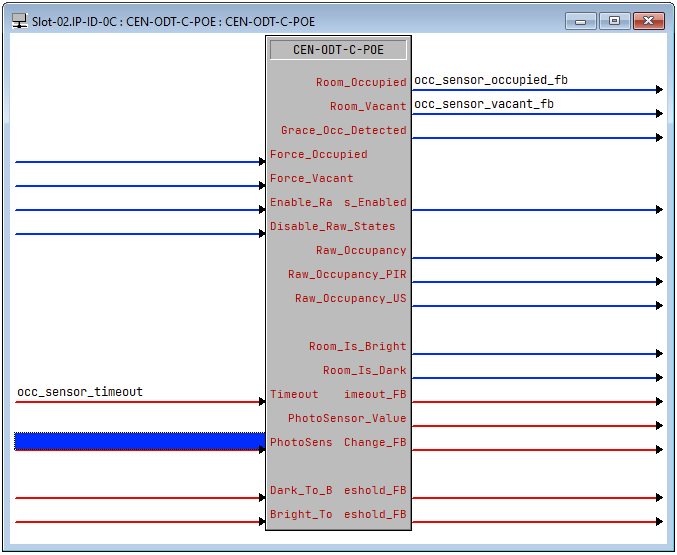
Here’s a real world example of something that had to be unit tested in the field. We had a Huddle Space that would automatically power on the displays when someone entered the room and shut them down 15 minutes after someone had left. When I wrote the code, I didn’t have access to the occupancy sensor hardware, but I assumed the signals for Room_Occupied and Room_Vacant would drive everything. There’s also a Timeout join to specify how long of a delay before Room_Vacant goes high. It can be set up to 30 minutes, so everything seemed to work great.
Testing in the field, the occupancy sensor would typically catch people as they walked into the room but if they sat motionless at the table during a meeting, the room would appear vacant. We played with the sensitivity adjustments, but the entire sensor really needed to be relocated in the ceiling. Unfortunately, with a very crowded ceiling grid already, the sensor was in the best location it could be.
But of course, during the first video call, the near end sat motionless while the far end talked for 15 minutes and the display shut off.
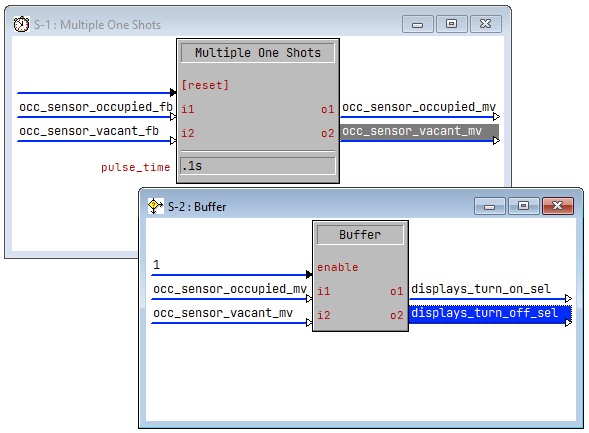 Tying room occupancy to display power (pulsed because there are buttons on the touchpanel to control the display, too)
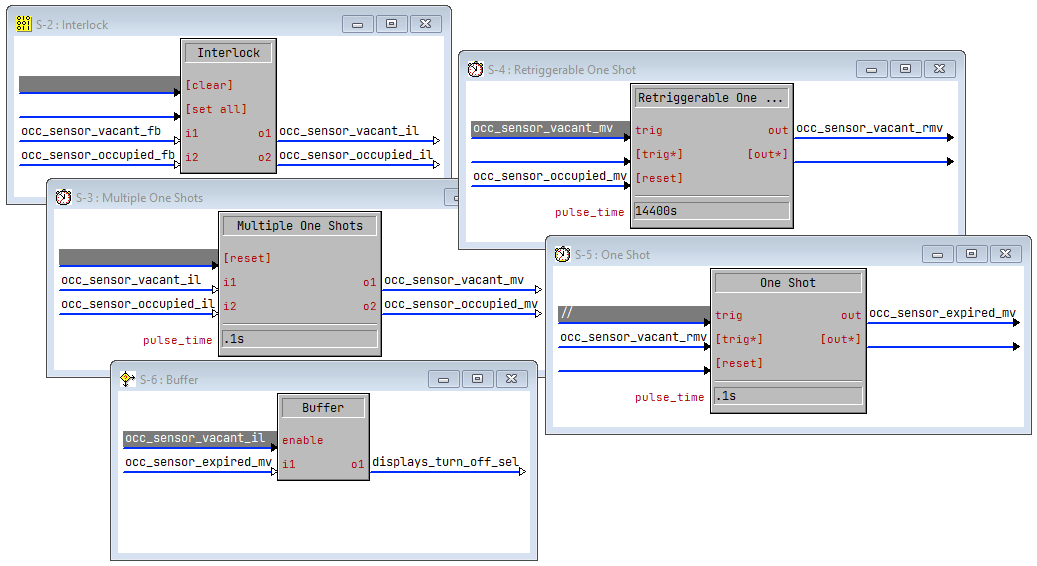
The customer asked if it would be possible to delay shutdown for 4 hours instead of 15 minutes. The timeout on the sensor could only be set as high as 30 minutes, but since we have a logic engine at our disposal I said, “Sure!” I reset the sensor’s timeout to 5 minutes and whipped this up to test:
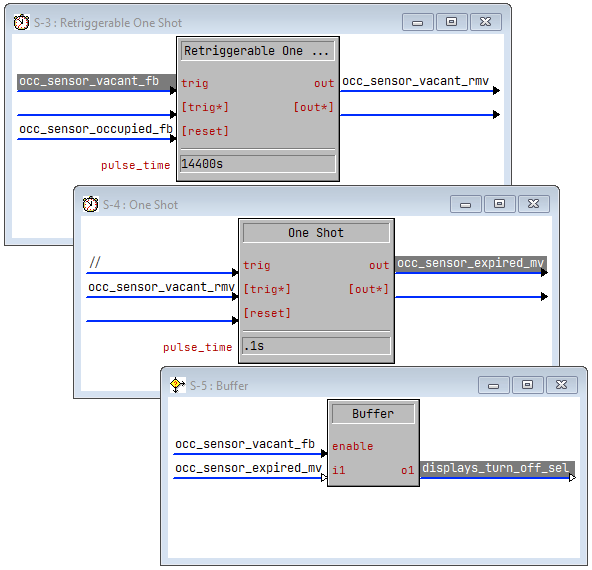 14,400 seconds is 4 hours. Go ahead, count it out!
Customer walks into the room, display turns on. Customer walks out and after 5 minutes I see occ_sensor_vacant_fb and occ_sensor_vacant_rmv go high in debugger. Great! Now begins the 4 hour timer to see if everything shuts down as expected. I want him to re-enter the room to make sure the timer stops and the room stays on. He walks into the room, occ_sensor_occupied_fb goes high and the displays immediately turn off. Well, that’s the opposite of what we want!
See if you can spot the bug in the program above. I stared at it for a few minutes but couldn’t see any error, so I checked the trace in debugger. Sure enough, occ_sensor_vacant_fb and occ_sensor_occupied_fb were both high for a fraction of a second. To the program, there was a moment where the room was in both states, so while the retriggerable one-shot was reset by occ_sensor_occupied_fb, the buffer allowed occ_sensor_expired_mv to propagate to displays_turn_off_sel.
I assumed those outputs on the sensor symbol would be interlocking (and break-before-make) but they aren’t! So my solution was to have the outputs drive an interlock symbol (guaranteed to be break-before-make) and the logic worked correctly.
 Break-before-make FTW.
Now that I had the logic figured out, it was time to test. For the first test, I dropped the 4-hour timer to 2 minutes and we could easily test the various scenarios of walking into or out of the room within that period of time. Once the integration testing was satisfactory, I bumped the timer back up to 4 hours. After a few days of observation, no more problems shutting down in the middle of a meeting, and the display is powered off each morning wht the staff arrives.
The Reality
If we could test this system for the next few years, I’m sure we would continually make improvements to it. But that’s not reality (unless you’re an on-staff programmer). Eventually, the system will need to be turned over and complete and you’ll be working on the next project.
Projects do not have infinite time. Fault-finding will have diminishing returns. Where is the break-even point?
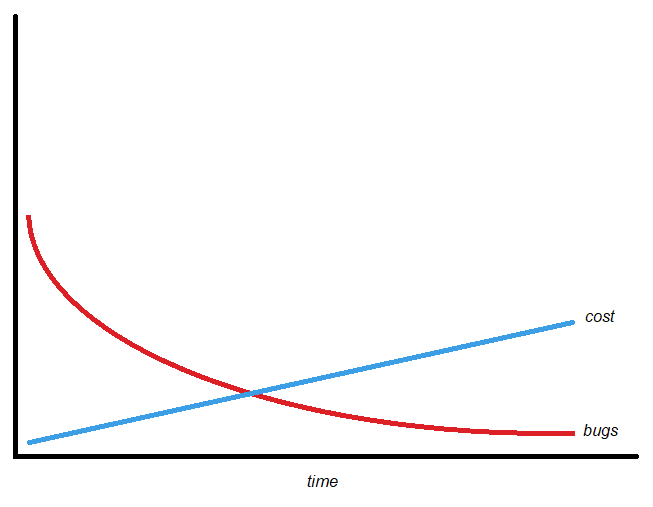 At some point, it is cost-prohibitive to continue fixing small bugs.
From the graph you can see that at the break-even point there may still be an unacceptably high number of bugs lurking in the system. It’s likely there will need to be a warranty period on your programming to ensure no “breaking” bugs are discovered once the system is in full use. But at some point, the cost to find and fix more bugs becomes too much.
Conclusion
Here is my laundry list of how to write “correct” programs:
- Modules (or libraries) abstract away details, so we can focus on the bigger picture. Gluing modules together produces programs.
- Modules MUST be bug-free or we can’t hope to write programs that are bug-free.
- Small driver programs should be maintained that exercise the module’s interface and logic.
- Integration testing into a larger program needs to happen once a module is deemed bug-free. This may require testing several iterations of the module using the driver program.
- Testing with real equipment is a MUST because the operation may differ from how logical testing was performed.
- Version control EVERYTHING. Fixes in one program could break otehrs, so we’ll need to track which version of a module was used where.
- Write documentation to discover if any areas of testing were missed.
- Understand that time is a limited resource; we aim for a bug-free program, but mind the break-even point.
- Make sure you give each projecst sufficient time to complete.
There, that’s my recipe for writing bug-free programs. It’s a lot of hard work and requires consistency to produce the best results. It’s something to aim for in 2022.